Table of Contents(目次)
What to install
To develop in Python, you need to install the following two applications.
- Python
- Text editor (Visual Studio Code will be used in the lectures on this site.)
In this lecture, you will learn how to install Python for Windows. If you are using a different operating system, you can find a wealth of information by searching for it. For example: “Python Mac OS installation.”
Additionally, regarding text editors, you can learn how to install and run Visual Studio Code. Visual Studio Code is free to use, allowing anyone to access it. Furthermore, it has a high market share, so if you have any questions about how to use the editor, you can usually find a solution quickly by searching for usage instructions.
If you have an environment where you can run Python, you can use applications other than those used on this site. Therefore, if you already have a development environment set up, you can skip this lecture.
If you are a beginner, try setting up your environment according to the instructions on this site. Once you become familiar with Python development, you may want to try setting up other development environments.
Installing Python (For Windows)
Installation on Windows
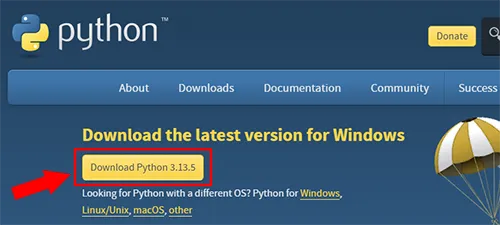
(1) Go to the official Python download page.
(2) Click the yellow button labeled "Download Python 3.xx.x".
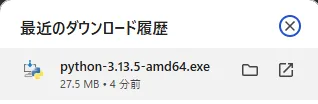
(3) Run the downloaded .exe file to launch the installation dialog.
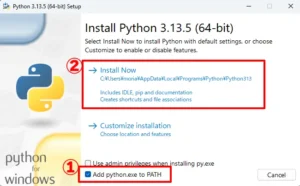
(4) On the first screen of the dialog box, check ① “Add python.exe to PATH” and click ② “Install Now”.
(* If you are familiar with Python development, you can choose whether to check “Add python.exe to PATH,” but if you are a beginner, please follow these steps.)
(5) Once the installation is complete, click the “Close” button to close the dialog box.
The installation is now complete.
Checking Python after installation
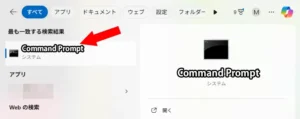
(1) Type “cmd” in the Windows taskbar search box, and press the Enter button.

(2) Confirm that the command prompt has appeared.
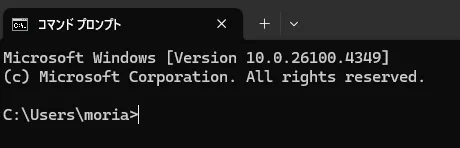
If the command prompt does not appear, search for “Command Prompt” and click on Command Prompt in the search results.
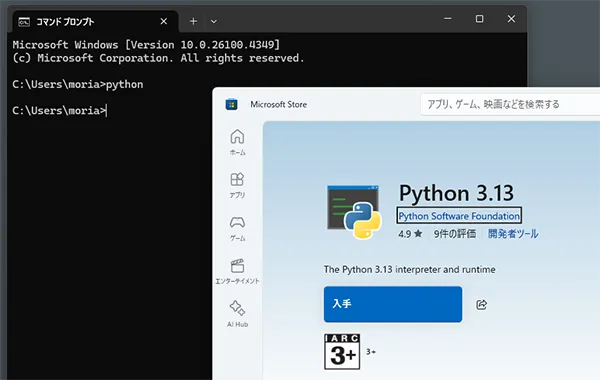
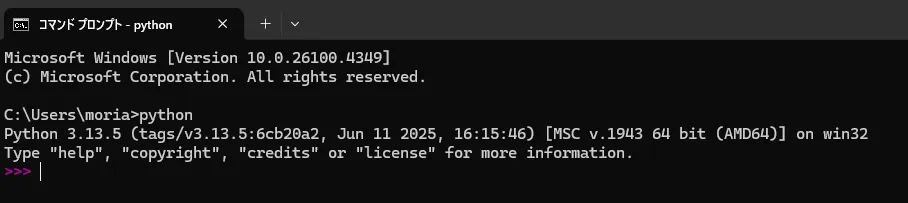
(3) At the command prompt, type “python” and press the Enter button.
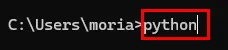
When you type “python” in the command prompt and execute it, Microsoft Store may launch. This is an environment variable issue, so please fix it as follows.
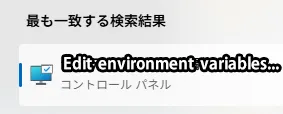
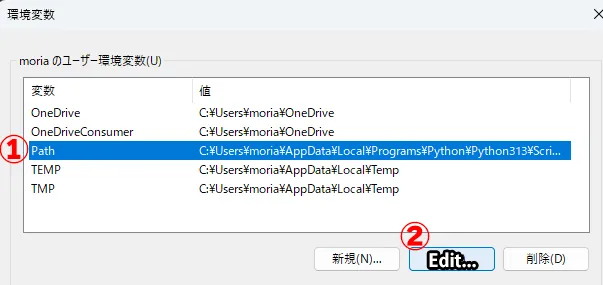
(1) Type “env” in the Windows taskbar search box and launch “Edit environment variables for your account”.

(2) Select ① “Path” from the environment variables, then press ② “Edit...”.
(3) Move items related to “Python” to the top of the list in the list of paths, and move items related to “WindowsApps” to the bottom of the list.
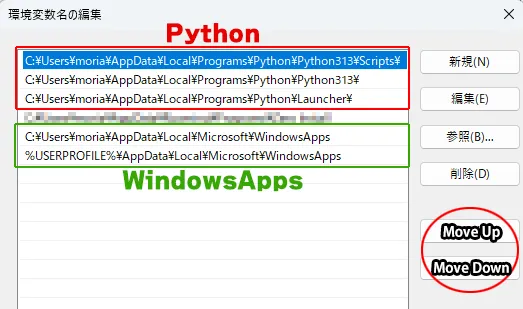
(4) Once you have finished editing, click the “OK” button to confirm your settings.
(5) Once again, enter “python” in the command prompt and try launching it.
(4) Confirm that the display appears as shown below (Python has started).
(Information such as the Python version may change depending on when you installed it. Confirm that the last line is “>>>” and that you can enter Python code.)
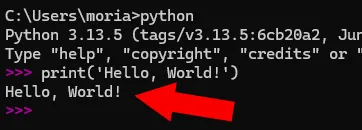
(5) The cursor is now positioned on the line “>>>”. Enter the following code and press the Enter key.
print('Hello, World!')
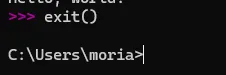
If the text “Hello, World!” appears as shown by the arrow below the figure, it indicates that Python is working correctly.
(6) Finally, enter the following code and exit Python.
exit()
If the display appears as shown below, Python has ended.
(7) Close the command prompt to exit.
Press the “Alt + F4” button or the “× button” in the upper right corner of the command prompt window to exit the command prompt.
Installing Visual Studio Code (For Windows)
Installation on Windows
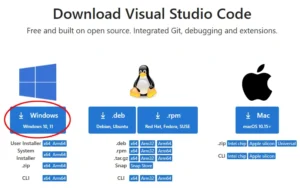
(1) Download the installer for Windows from the Visual Studio Code download page.
(2) Launch the installer and install it. (The default settings for each item are generally fine as they are.)
- License Agreement
- → I accept the agreement
- Select Destination Location
- → Leave as is
- Select Start Menu Folder
- → Leave as is
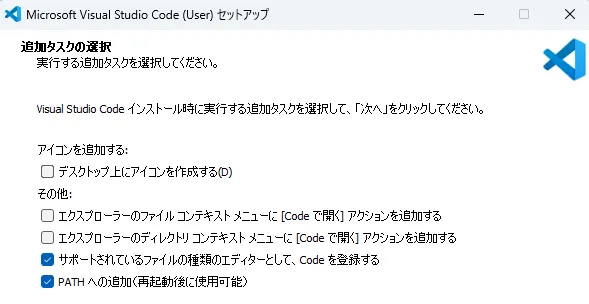
- Select Additional Tasks
- → Leave the default check marks as they are and add any additional check marks as desired, then click OK. (If you are unsure, leave the default settings as they are.)
(3) Once the installation is complete, launch Visual Studio Code.
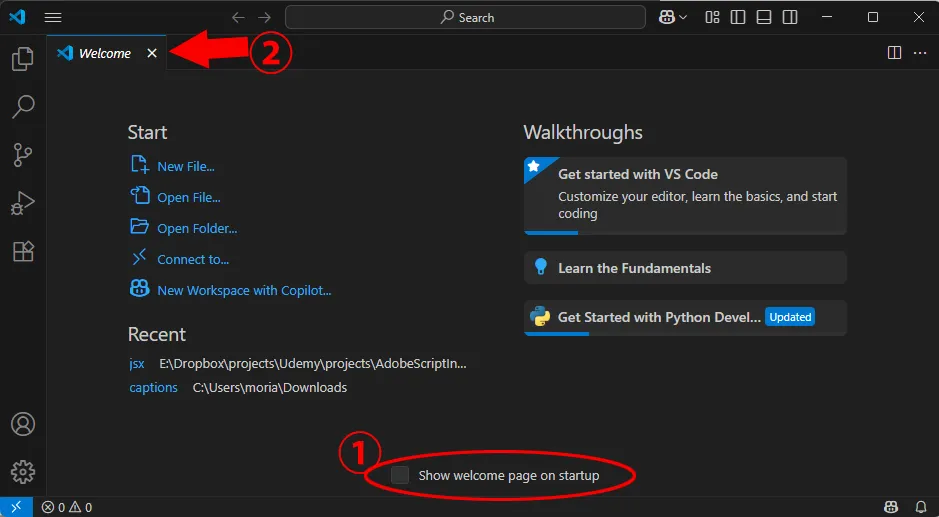
If the screen shown below appears, the installation was successful. The Welcome screen will appear first, but it is not necessary, so ① uncheck “Show welcome page on startup” and ② close the Welcome screen tab. (* When you launch Visual Studio Code, a screen other than the Welcome screen may appear. If you are unsure how to configure the settings, you can simply close the tab.)
Visual Studio Code extension (all OS)
Visual Studio Code offers a wide range of third-party extensions, which can help reduce the effort required to write code. Let's start by installing the Python extension provided by Microsoft.
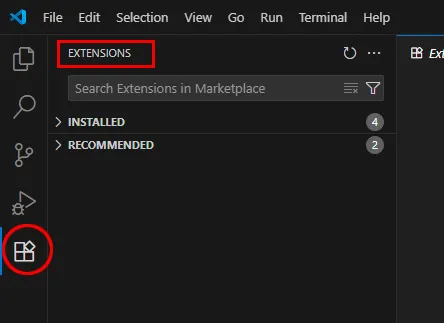
(1) Click the icon shown below on the left side of the Visual Studio Code screen to open the EXTENSIONS panel.
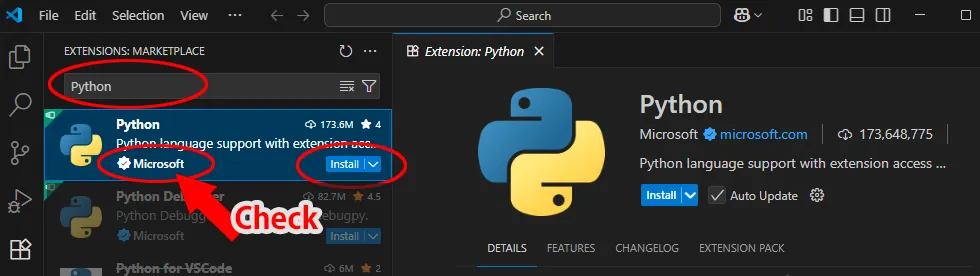
(2) Enter “Python” in the search box of the EXTENSIONS panel.
(3) Install the tool provided by Microsoft from among the extensions that appear in the search results.
(4) Once the installation is complete, check the list of installed extensions.
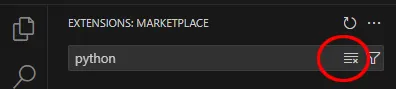
After installation, click the following button to clear the text entered in the search box and end the search.
When the search is complete, a list of installed extensions will be displayed in the “INSTALLED” panel. From this screen, you can check the installed extensions. You can also configure extension settings, such as uninstallation, from this screen.

(5) Repeat steps (2) to (4) to install other extensions.
Here are some of the extensions used by the webmaster. There are many other extensions available, so feel free to add them as needed. (Clicking the Install button on the page linked below will take you to the Visual Studio Code screen.)
| Alignment | This tool aligns equal signs and colons vertically. |
| Smart Delete | This tool automatically deletes line breaks and spaces when you click the Delete button in places where there are consecutive line breaks or spaces. |
| Trailing Spaces | This tool removes unnecessary spaces. There is an option to automatically delete them when saving files. |
| Language Pack for Visual Studio Code | Microsoft provides these language packs. Using them, you can change the user interface of Visual Studio Code to a different language. (This applies to the globe icon extension.) After installation, restart the application, and the display will switch to the selected language. (The lectures on this site are explained in English. If you are comfortable with the English UI, it may be easier to learn without changing the language.) |
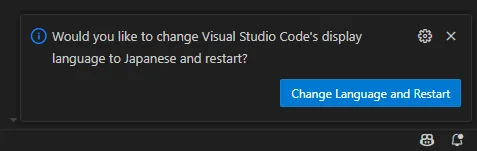
When installing extensions, a message like the one shown in the figure above may appear at the bottom right of the Visual Studio Code screen. Please read the message carefully and follow the instructions.
In the case of the message shown in the figure above, clicking the blue button labeled “Change Language and Restart” will restart Visual Studio Code, and the UI language should change.
Visual Studio Code settings (all OS)
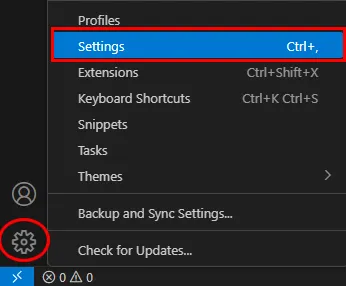
To configure Visual Studio Code and various extension settings, click the gear icon (located at the bottom left of the screen) and then click "Settings".
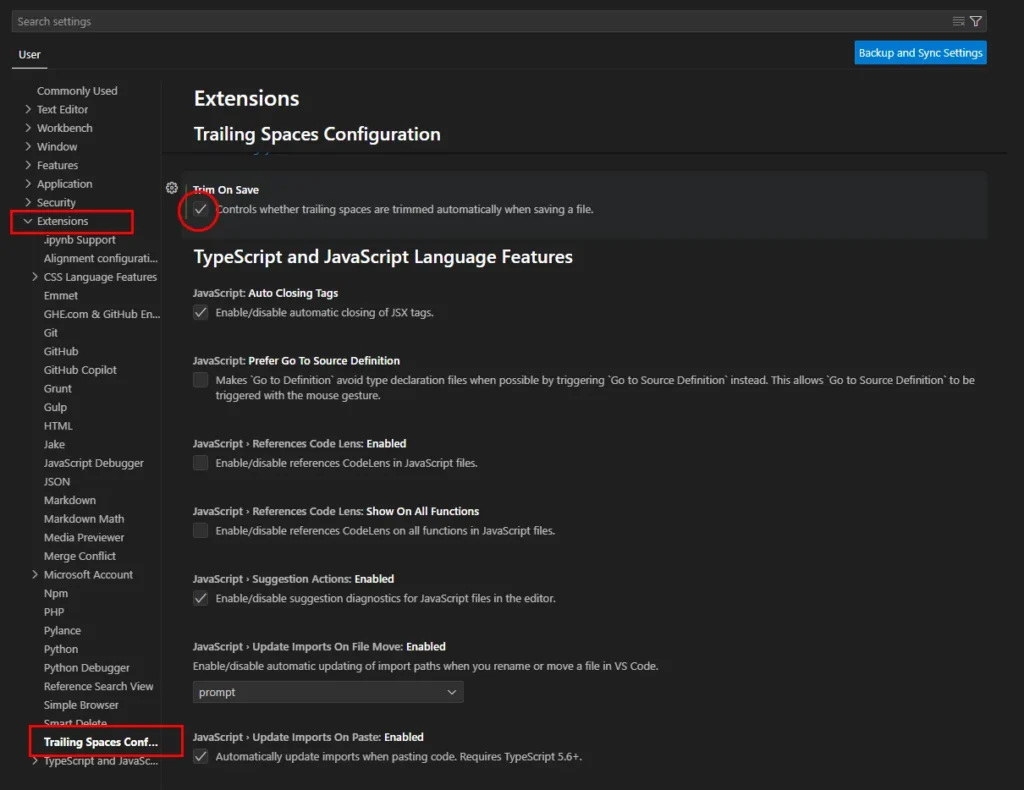
From the Settings screen, navigate to the item you want to configure and change the settings. The figure below shows an example of changing the settings for the Trailing Spaces extension.
From the Settings screen, navigate to “Extensions > Trailing Spaces Configuration > Trim On Save” and check the box. By checking the “Trim On Save” option in the Trailing Spaces extension, unnecessary spaces will be automatically removed when saving files. (By default, these spaces are not removed, so you need to change the settings from the Settings menu.)
In addition, you can make various other settings changes related to Visual Studio Code, such as font size settings, so please explore these options.
Python operation check (all OS)
Here are the steps to run Python from Visual Studio Code.
- Creating a new folder
- Opening a folder in Visual Studio Code
- Creating a Python file
- Writing code
- Saving the file
- Running
Now, let's go through them one by one.
(1) Create New Folder
When writing code, not just in Python, it is recommended to create a dedicated folder (directory) for development. When executing the code introduced on this site, first prepare a dedicated folder.
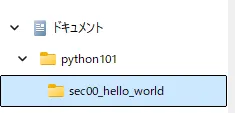
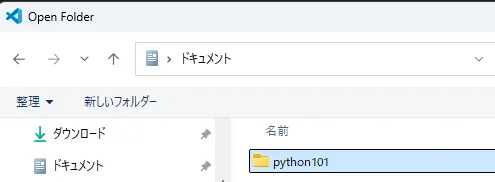
The folder can be located anywhere; for example, create a folder named “python101” inside the ‘Documents’ folder. Additionally, create folders for each section inside the “python101” folder as needed.
The figure below shows the creation of a directory named “Documents/python101/sec00_hello_world.”
(2) Open the folder in Visual Studio Code.
Press “File > Open Folder...” in the menu to display the folder selection dialog, then select the folder.
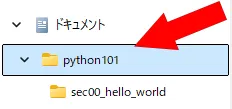
* If you have created folders for each section inside the “python101” folder as shown in the figure below, select the “python101” folder, which is the root directory.
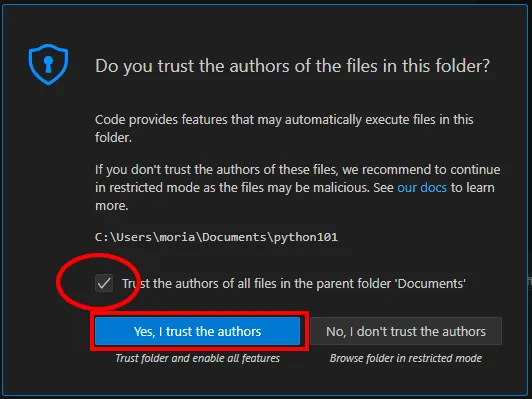
When you specify a folder, a dialog box like the one shown below will appear. Check the “Trust the authors…” box and click the “Yes, I trust the authors” button. This is a security dialog box that asks the user to confirm that the file or folder is not suspicious.
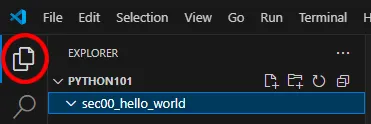
After opening the folder, open the Explorer panel, and you should see the screen shown below. Please check it.
(3) Create a Python file
Operate from the Explorer screen shown earlier.
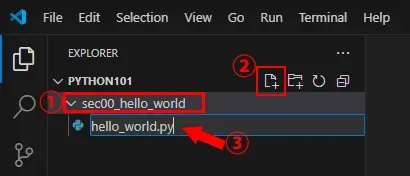
- Select the folder where you want to create the file.
- Click the “New File...” icon.
- A field for entering the file name will appear, so enter a name.
- For this example, we will use “hello_world.py” as the file name.
※Do not use double-byte characters such as German, French, or Chinese in file names. In Python, use a combination of ASCII code alphabets, numbers, and underscores ("_"). When entering file names, be sure to include the extension (".py").
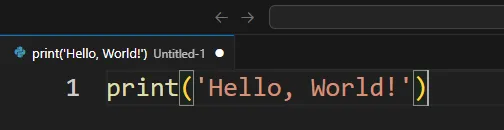
(4) Enter the following code into the Python file you created.
print('Hello, World!')
(5) Save the file.
Click “File > Save” in the menu, or press “Ctrl + S” to save.
(6) Execute the code in the saved file.
(6-1) Open the “Run and Debug” panel and click the “Run and Debug” button.
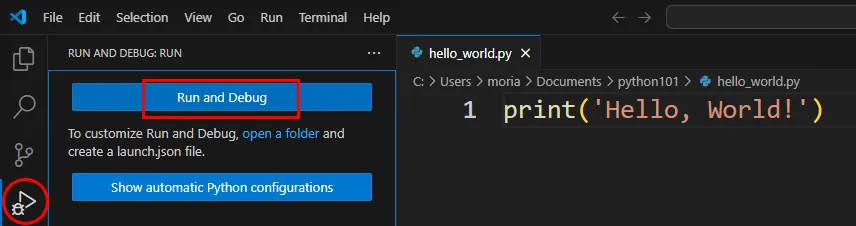
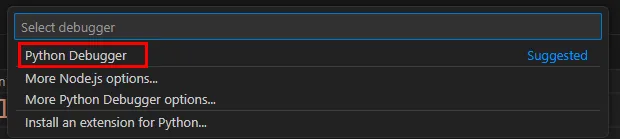
(6-2) Select “Python Debugger” from the items displayed at the top of the screen.
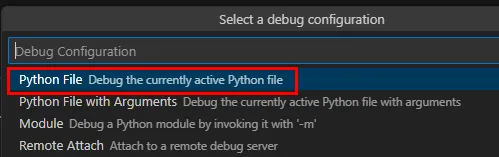
(6-3) Select “Python File” from the items displayed next.
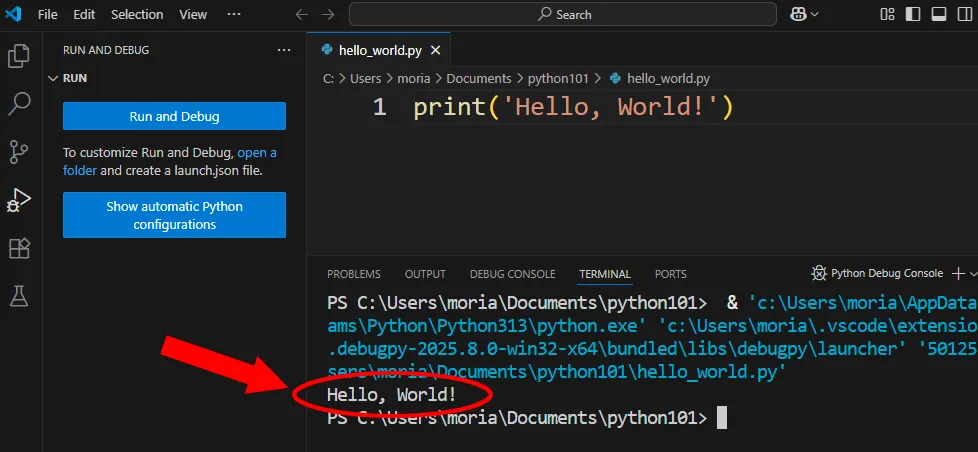
(6-4) As shown in the figure below, the TERMINAL window will automatically open at the bottom of the screen and Python will be executed.
In this case, if the text “Hello, World!” appears in the TERMINAL window, the process was successful. If an error message appears, carefully review the program code for typos or missing characters, and verify that the execution steps are correct.
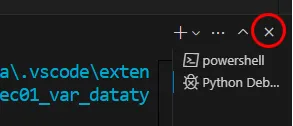
After executing the code, you can close the TERMINAL window (panel frame) by clicking the × button in the upper right corner.
Set Python execution conditions (all OS)
When you ran Python earlier (after clicking the “Run and Debug” button), you had to select several Python execution conditions. It is cumbersome to choose them every time you run Python.
In Visual Studio Code, you can specify execution conditions in the “launch.json” file so that you don't have to select them every time.
"launch.json" file
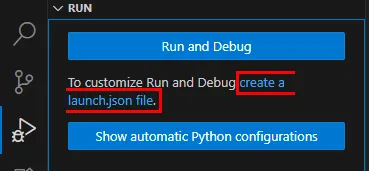
(1) Click “Run and Debug” panel, then click “(To customize Run and Debug )create a launch.json file.”
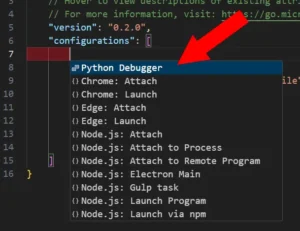
(2) Select “Python Debugger” from the items displayed at the top of the screen.
(3) Select “Python File” from the items displayed next.
(4) The launch.json file is created.
As shown in the figure below, when the launch.json file opens, auto-complete candidates are displayed at the cursor position, but these can be hidden by pressing the Esc key.
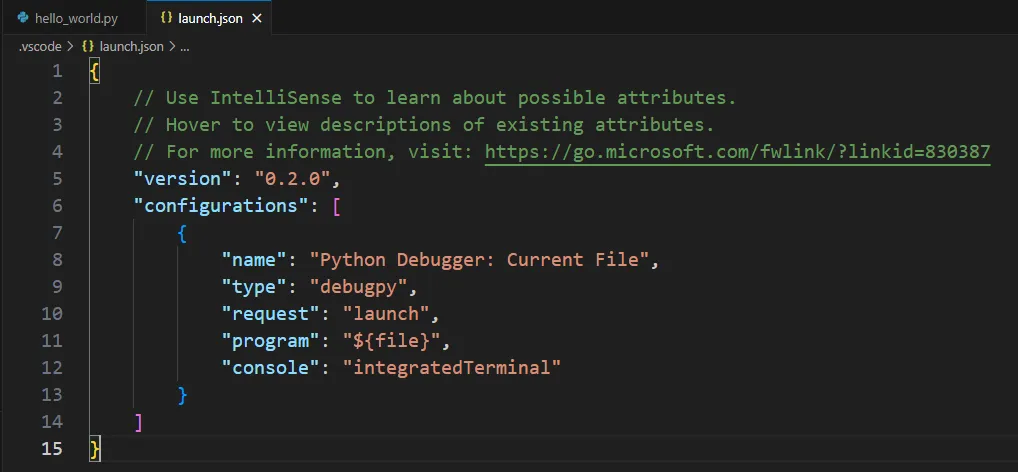
(5) Confirm that the contents are the same as the figure below. Then, save the launch.json file over the existing file.
You can close the launch.json file by clicking the × button on the tab.
(6) Let's try running Python.
Once you set up the launch.json file, the “Run and Debug” panel should look like the figure below.
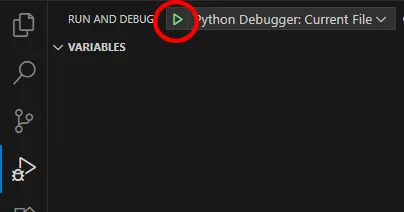
Verify that the code for hello_world.py is displayed at the front of the screen, and then press the “Run” button (F5) at the top of the “Run and Debug” panel.
Then, the execution condition selection items will not be displayed, and Python processing will be completed. From now on, you can execute the code by simply pressing the F5 key after writing the code.